Saturday, January 29, 2011

I am both testing my test blog via text and updating that EK-0205 is ready to be primed!

Thursday, January 27, 2011

RIP Babe-A Fett :( There Are Some Things That You Don't Come Back From

It seems that the rapid changes in temperature in the back seat of my car was too intense an environment for a clay sculpture.  The piece is now "pieces" and is not salvagable at all.

I am upset, but these things happen, I suppose.  I cannot help that my back decided to give out at a time that the poor Fett needed me most LoL

I will revisit the world of Mandalorian Chicks in the future, but for now (now meaning "as soon as I can grasp a tool to sculpt with"), EK-0205 still needs to be based and painted, packaged and shipped; and my homegirl Kelley Ray has a Mighty Jedi Ewok by the name of K'Ray Noobslappa coming her way.

:(

Tuesday, January 25, 2011

Babe-A Fett may be no more....

I have been suffering severe back spasms, and in my numerous trips to the doctor my current project fell over and broke into more than 2 pieces.  I am more than a little broken up about it, but hey, I honestly don't KNOW if it can be repaired (my back prevents me from getting her out of the car LoL).

I DO know that I can make another one.  We shall see.

Sunday, January 23, 2011

Babe-A Fett: Part 1 New Clay!!!

So while my Stormtrooper was curing, I started my next project. 

The name "Babe-A Fett" is a working title, but the point is that she is a female Mandalorian who's armor is specifically styled after the Sarlaac snack.

I started off with my normal wire sculpture and went to work.  Things progressed very quickly with this piece because I took a step in the right direction:  I got "real" stone clay to work with.  The difference is astounding.  The medium is still water-based clay, so it will "dry" with time, and the higher quality was apparent the moment that I added the first bit of detail.

Another thing that I did differently was to anchor the wire frame to a "pedestal" for easy transportation and rotation while i worked.


This is where I got to before dinner.


And this one is from later that night.  As you can see the clay holds detailing a LOT better.


In my days of "replacing" all the lost Star Wars toys from when I was a kid (they were numerous, but you could say that I was "robbed" of them) I bought everything I saw on clearance no matter what kind of as a compulsory  sickness.  Now, I have an absolutely insane collection of miscellaneous Star Wars crap that I have no emotional attachment to.  I found a 12 inch Jango Fett in one of my bins with a rocket firing backpack!!!!!

SCORE!  It isn't a hard shape to make in clay at ALL, but a rocket firing backpack was too tantalizing.  I also used Jango's knee guards, honestly, because they literally fit like a glove over the boots that I had sculpted.  I think they look nice.


Okay this picture is from the next day after work, right before I went to bed.  See how quickly the progression?  I am trying to not sound like a braggart. I realize that I am obviously regaining skills that I had let dwindle over the years, but the level of malleability is astounding.


ROCKET FIRING BACKPACK!  Oh, and you can see some detail.


The belt, with the distinctive Fett pouches.


The Mandalorian chest plate (obviously altered for gender specific reasons), padawan Jedi braids, and you can just see the cape over the left shoulder.

Saturday, January 22, 2011

EK-0205: Part 4 Touch Up

Against my efforts, the shoulder armor pieces suffered from air bubbles!

I took this opportunity to sculpt in the pockets with Green Stuff modeling putty (yes, I roll dice...) and in the process add a few items of detail that weren't possible with the medium of clay that I chose.

Note the "action figure seam" that I was going for W007!!!  Also, I fixed the shoulders and altered the gun to my liking.  I am adding a badge (the green circle), and I also added the distinctive "011" design that all Stormtroopers share.


I also had a little fun and added her ID number to one of her satchels.

Next; sanding, primer and paint.

EK-0205: Part 3 The Molding

Every single thing that I have ever molded and cast was poured metal into a earth-clay mold.  You know, so I always "broke the mold." 

Ha.

This was a new experience for me, and loads of fun.

My clay choice came back to haunt me right as I started to mold the piece.  Her left satchel feel off and shattered, so I was forced to quickly sculpt one and mold her without the clay there time to properly cure.

Big mistake for me.

The Smooth On branded kit that I used coats the piece in liquid silicone coats that get progressively "harder".  As the clay that I used on her satchel didn't properly cure, the silicone in that area wasn't allowed to properly cure and the mold collapsed in these areas. 

But I prevailed.

Pictures of the process:


Note the re-sculpted satchel.


The straws are for "vents" because the shoulders are a little higher than the arms, which makes them higher than my pour point through the neck.  The short of it is that I wanted to make sure that the arms were allowed to be filled with plastic.


The "shell" is a two-part mixture that hardens to keep the mold in the right shape.

I molded the head separately, and when I made the outer shell, I shaped it such that it formed the silicone portion to the altered shape that I wanted.


EK-0205 cast in Plastic.

EK-0205: Part 2 The Carving

So on the 3rd of January I had the basic sculpture done, but I needed to carve in the fine detail.  I let the sculpture dry for a day and a half, and got to it.


And then I had to let her dry.  It was torture not touching my project for a few days, as I had grown quite attached to her :)


 Yes.  She is slew-footed. 

I added a few details later, and let the clay dry for a day for carving.  Crayola clay is about a 7 out of 10 in this respect.  Or so I thought until the mold came off.

EK-0205: Part 1 The Clay

For the last few years I have made all of my favorite people gifts as a present under the "alias" the Agent of Xmas Chaos.  This year was...  chaotic... for me so I had to wash on my planned project of Zombified Pillow Pets.

I am the sort of person that needs projects to occupy my time, so I opted make presents for BIRTHDAYS.   As an pretty adept sculptor in my younger years, and a rabid Star Wars fanboy I decided to go with statues based on Star Wars characters.

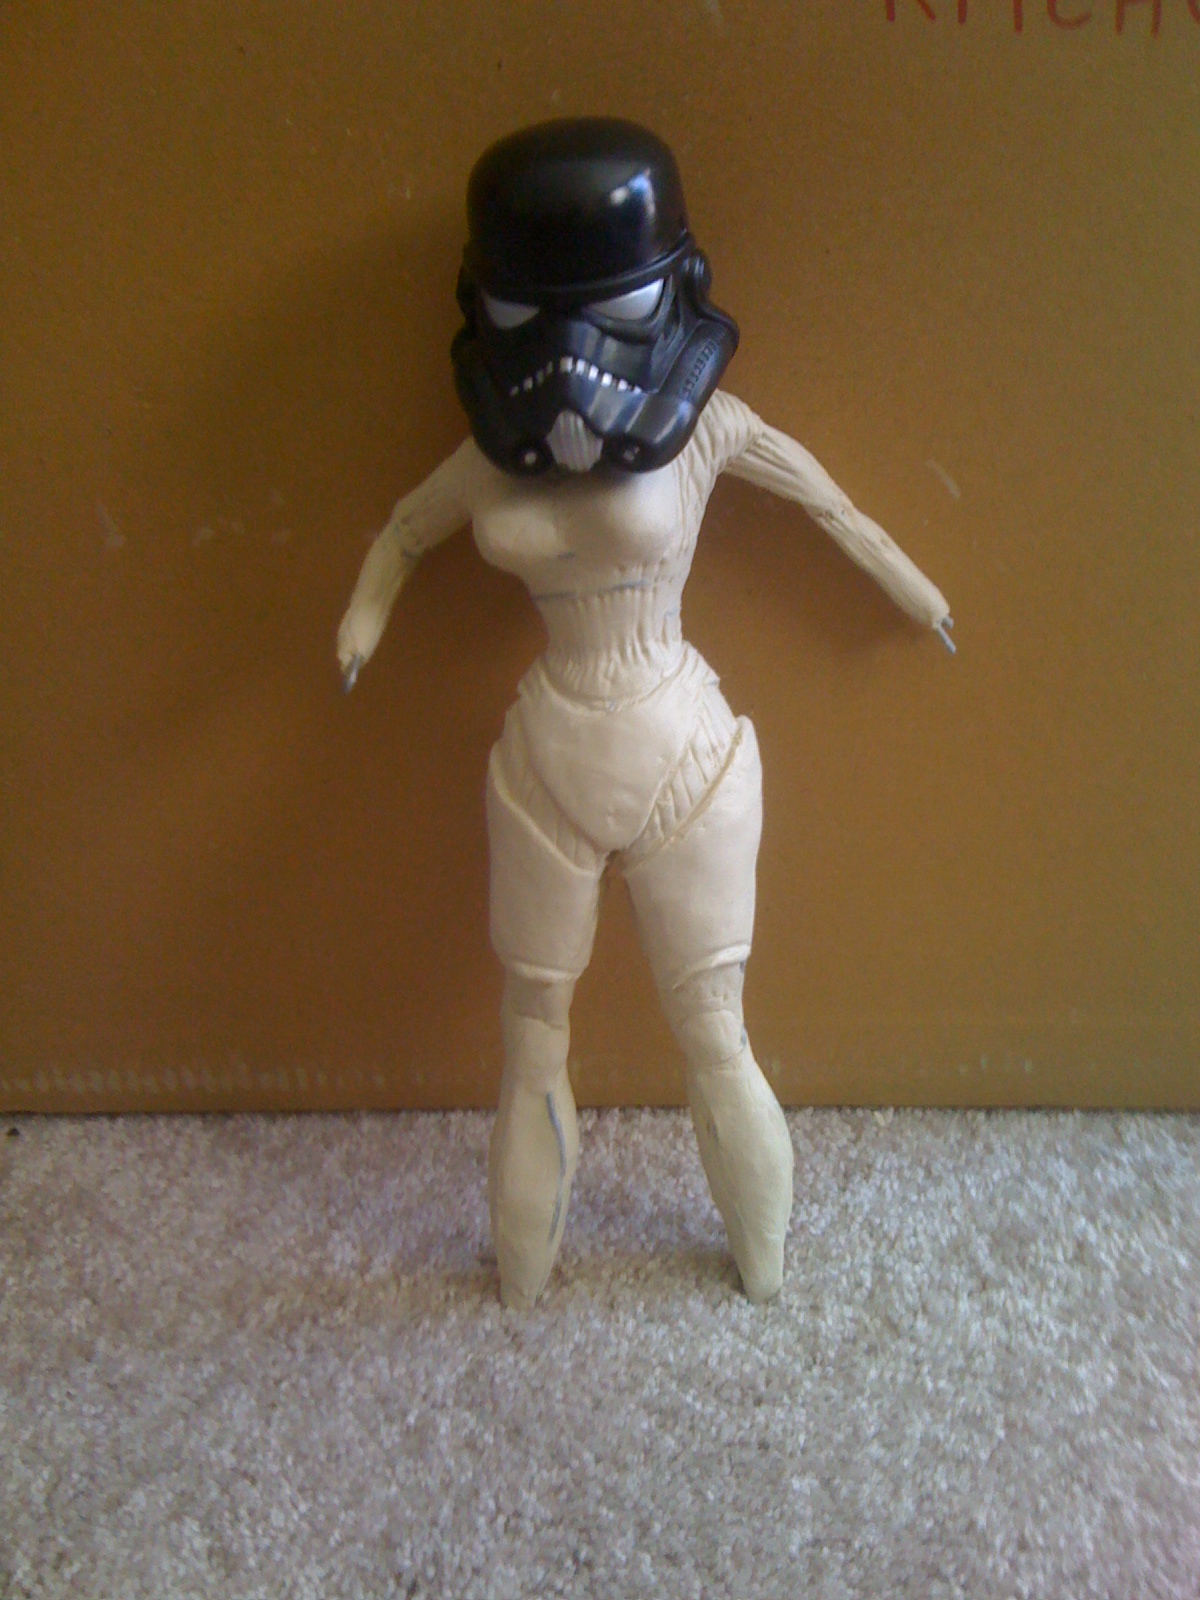
My first venture, started on January 1 2011, stems from a conversation that I had with a friend a few months before she moved to Korea.  The piece, EK-0205 is a female Stormtrooper. 

EK started off as a wire frame "gesture sculpture" made out of galvanized steel cable.  I have always drawn and sculpted from the "inside out" and this seemed natural to me.


I make chain mail when I am really, really bored, so I am fairly adept at manipulating metal wire :)  I piped out this in about 3 hours (after starting over at least once).  The next morning I started filling in the frame with clay.

I felt that after such a long hiatus, I needed to start "from the basics", so I went with Crayola Air Dry clay from my locale Wal-Mart.  This is a decision that I came to regret to a certain extent later on.  If you like to detail as you progress, as I do, THIS IS NOT A VIABLE OPTION FOR YOU.  If, however, you like to slop on clay and carve detail later on when the clay is kind of dry, then, meh...

But it really wasn't that bad.

An image of the wire frame after the "fill in" process:


And some after a few layers of detail:


Now, I feel compelled to explain the helmet.  I mentioned that I sculpted in my younger years, and that I am a rabid Star Wars fanboy, right?  Well, I have made so many Stormtrooper/Darth Vader/Rebel Pilot helmets at so many different scales in my life that I simply didn't feel like it.

So I cheated.  I used a Stormtrooper helmet off of a bobble head that I bought years ago on clearance. 

I. Have. Many. I also intend to alter it, but more on that later.

Almost immediately, I knew that the finished product was NOT going to make it to Korea in one piece.  Since I had also decided early on in the project that I wanted to make this look like an action figure, I decide that I was also going to cast EK-0205 and make her in plastic resin.  This accomplished three goals.


  1. EK would be sturdier, and would NOT vibrate apart in shipping.
  2. When cast, I could "shift" the mold on the mold seams and create that ridge that all action figures have along where the mold seam was in the casting process
  3. I could stretch the mold to make EK's head look a little more feminine.
 SO, back to the scuplting:


A few attempts at hands were promising, but the clay kept cracking and falling off.  Back to the bobble head!  Bonus, I liked the gun in her right hand way better than the one(s) that I made, because it gave the "slighty deformed" look that I was going for.